Thursday, February 28, 2008

ZIM, the Desktop-Wiki - or "Taking Notes 2.0"

For the stuff I'm writing here, there are two important roots.
One is the common note taking everyone does, on paper, on computer, or on whatever medium available.
The other are wikis - web 2.0 knowledge management systems for sharing ideas, documentation, or notes with others in a community.
I tend to structure my ideas hierarchically by topic, but easy linking between pages is a must. I need simple text formatting, the possibility to link in external documents or web pages -- all features available with most wikis. Yet, a web-based solution is not very appropriate for personal notes, especially as I'm currently sitting in a hotel room w/o any network connection.

Some time ago, I had a look for desktop wikis. The one I found best is ZIM; since then, I've been using it for nearly all my notes about quite a bunch of topics. Even this blog page I'm writing in it, because I got used to the easy text formatting and html export, far more than the WYSIWYMG editor of this blog site (as in What You See is What You (or your visitors) Might Get).
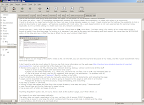
Time to show you an image of the stuff I wrote so far, in ZIM. On the left, you can see the top-level structure of my notes, and the "usual" assortment menu items and buttons. And in the main text, you can see the image you are looking at which contains the text which ... ... ... just ignore it.

I don't want to write too much about it, the you can find more information on Jaap's web page. Just an unsorted list of the features I like most ...
  • Stores each page in a .txt file, the directory structure reflects the note hierarchy
    • easy network sharing, backup, version control and all this stuff
    • there is even an integration with subversion and cvs
    • pages can be edited externally, e.g., when you just have the .txt files, but no ZIM; and reloaded later on
    • I use it at home, at work, and on my notebook, and merge it via subversion - no problem with it.
  • works on Linux, Windows, and any other OS that supports Perl and Gtk
  • text formatting by shortcuts, yet also by manually using the wiki format statements, and reloading the page
  • pages can be exported to html; this is what is going to happen to this page as well when it is finished
    • keeps the directory and link structure, image embedding, and everything
  • the help is written in ZIM itself
  • linking in both web pages and files from the current directory is as easy as typing "./document.pdf"
  • uses CamelCase and similar features for page linking
  • has a pane with a folder and page structure

Anything forgotten? Quite a lot, I'm sure, have a look at the author's page, you'll find it there ;-)

For those of you who have seen tiddlywiki: The latter does not need a application of its own, yet has a lot of severe (IMHO) drawbacks:
  • everything is saved in one large file which contains both the java script code (~200kB) and the notes
  • saving takes a lot of time on a non-local drive
  • version management, especially merging between different systems, does not really work

Another Crashed Train Information System - Linux, this Time

I've seen quite a bunch of crashed visitor information systems, ATMs, and similar, on my my daily what-the-f__k page http://www.dailywtf.org/, all of them Windows based ... now it is time to show the Linux version of it!

As every Linux-user will recognise from the photo, there is only one way to crash such a system if it is Linux-based ... fry the harddisk. No blue screens, no "segmentation fault" dialogs, no kernel panics ... (no, the picture does not need to be rotated.)

On the right, you can see how the departure information should have looked like. And for the Germans among you - have a guess which major train station it happened on ;-)

BTW, the ticket vending machines from the "DB" are using Windows. And, I did get my train, which is not that common, even (especially?) in Germany ...

Friday, February 22, 2008

Java, PDFRenderer, and the Importance of "Order"

There is a great Java package for displaying PDF files inside your Java application: PDFRenderer, developed as part of the java.net approach (javadesktop/swinglabs). Unfortunately, the order in which you do certain things is very important.
So, you need to do the following (in the Code):

  1. Create the JFrame, and create and add the PagePanel from PDFRenderer
  2. Show the JFrame (setVisible(true))
  3. Show the PDF page you want to show (PagePanel.showPage(...))

This seems trivial, is done this way in the samples, yet ... change the order, and the only thing you get is "no page seleceted".

  • setVisible before adding PagePanel: "no page selected"
  • setVisible after showPage: "no page selected"
  • adding PagePanel to a visible JFrame: "no page selected"
  • showPage in an invisble JFrame: "no page selected"
  • and so on ;-)

Great software, isn't it?
By the way, it can only show pdf version 1.4 (from Acrobat/Reader 5.0), and if there is a problem, you get an exception trace to System.err, yet no way to catch the exception ... the display is running asynchronously in a thread of its own.

Have fun!

Getting Birthday Greetings twice a Year with Skype

Wondering how to get birthday greetings from most of your friends more than once a year? Just change your birthday in your Skype profile regularly ...

A friend of mine just did it, unintentionally, though. I got a note from Skype that he was going to have his birthday in a few days, entered it into my calender, and send him greetings on the day. Then, by coincidence, I checked his Skype profile again ... and noticed that the birthday was 10 months later, now. (To tell the truth, I noticed a mismatch between his age and the difference between his birth year, and 2008. Already wanted to post it to my favorite What-the-Fork page.)

I apologised to him, and he told me that quite some people had greeted him, so he noticed the mistake in his skype profile, and changed it. Yet there is no reason why it shouldn't work, regularly, most (Skype) friends will forget it anyway in a few months, and some will even add both (or even more ;-)) of your birth dates into their calenders ...

Have fun.

Monday, February 18, 2008

Migrating Windows XP from Pentium4 to Athlon64X2

You have a running Windows XP system on an "old" Intel-based processor, Pentium 4, e.g., and you get a new computer with an AMD-based processor, an Athlon64X2 4800+, in my case. Switching the hard disks from one machine to the other is easy, of course, yet the system doesn't boot ... due to

  • different hardware access layers (HAL)
  • different hard disk (SATA) controllers
  • different CPUs
  • possibly more reasons.

But, there are solutions for everything ... even though MS says it's not possible (at least, they say it is impossible to switch CPU types when using sysprep, see here).

Step 1: Backup

Save all important data. You never know what is going to happen.

Step 2: Remove Drive Letter Assignments

If you don't want to move the harddisk, but copy it instead onto another one, you need to remove all drive letter assigments. Otherwise, if your C: system is copied onto a G: drive, you will end up with a G: drive on the new system ... which does not really work. See "Forking a XP-installation": Remove all entries from the registry-key "HKEY_LOCAL_MACHINE\SYSTEM\MountedDevices"

If you use the copying approach, some more steps are necessary, especially making the hard disk bootable by makeing a rescue boot, and executing fixmbr and fixboot sucessfully. Also, the copying itself needs to be done on a third(!) system.

Step 4: Disable intelppm.sys and/or processr.sys

There are two system services that are left untouched by Windows XP when doing a repair as we are going to do below, both responsible for Intel processors -- microcode loading, etc. Thus, either

  • disable them before shutting the old system down for the last time (services.msc, "Disable")
  • Boot your windows XP CD into rescue console mode, and execute "disable intelppm" and/or "disable processr" (use "listsvc" for listing the services). This can also be done between steps 5 and 6, if necessary.

Thanks to Ben Armstrong from the Virtual PC Team for this information; also see here.

Step 5: Repair the system

Use the XP CD to boot, select "Install", then, "Repair". Makes a clean installation of the system, yet keeps all software, user etc. settings, programs and data. This is the main reason for doing this in the beginning, instead of a clean install.
Make sure you have a XP CD with Service Pack 2, to avoid both the trouble of reinstalling it, and any unexpected pre-SP2-behaviour ...

Information about this repair can be found, e.g., here.

If you skip this step and just boot the old system on the new machine, you get a blue screen of death (BSOD) -- usually "inaccessible boot device", also here or here.

Step 6: Boot the half-installed system

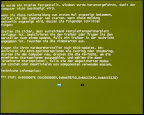
STOP: 0x0000007E (0xC0000005, 0xBAA28750, 0xBACC342C, 0xBACC3128)

Part of the repair process, as any other windows install process, is a reboot. If the reboot fails with a blue screen (of death, BSOD), or a green screen (yes, really, see figure), you need to do step 4 ("disable intelppm"):
STOP: 0x0000007E (0xC0000005, 0xBAA28750, 0xBACC342C, 0xBACC3128)

Apart from this, you need to finish the installation, including new hardware drivers (they'll have changed, anyway), and similar stuff. You should have a running system, now; otherwise, contact me with detailed questions ;-)

Step 7: Patch the system

Last thing to do: install the current MS patches. You overwrote all system files, so you are back to SP2 state ... that means about 50 patches, currently.

Step n: Have fun.

As much fun as one can have with a windows system ....

Appendix A

As I found out later (12th March 2008), it is possible to copy the "repair" registry into into a non-booting system via the repair console (booted from CD). This is usually the first step on the way to manually copying the least recent registry from a system restore point. On the other hand, it is possible to copy c:\windows\repair\system into c:\windows\config\system, thus replacing the system registry only, while keeping the rest of it, and forcing hardware re-detection on the next boot

Unfortunately, this did not really work out on the one time we tried it ... the system booted, yet the second the mouse cursor appeared it re-booted.

On the other hand -- if you have a system that windows is not willing to repair because it is simply not detected by the boot CD for the "repair-install", doing this surprisingly makes the CD rediscover the installation ... no idea why it wasn't found in the first place, yet it helped. Go back to Step 1, then.

Appendix B

After the finished the install on the new hardware, the installation still contains the information about all the old hardware ... from on-board network devices via ACPI to mainboard resources. There is trick to make the hardware configuration panel to show "non-available" devices, though, and delete the ones you surely never need again. The non-available ones have "lighter" icons.

  • start a cmd shell
  • set devmgr_show_nonpresent_devices=1
  • devmgmt.msc

Just don't delete anything you might need again, and rather keep the USB stuff ... also, do not delete any IDE channels, as the ones where no drive is attached, are shown as missing as well.

Thursday, February 14, 2008

Speeding up Firefox "Tab Effect"

There's the great plugin for Firefox called "Tab Effect" which does 3D rotation on a cube when you change tabs. No important use, yet great animation. For Windows-Users who want Linux XGLX or MacOS feeling. Unfortunately, the switching takes time ... but there is a speedup patch:

"How to make it faster!

by aquanautmonkey on December 17, 2007 (rated 7)

Nice effect! To make it faster, do the following:

  1. Open the tab_effect-1.1-fx.xpi file in a zip archive editor (7zip, etc.)
  2. Navigate to content/javascript.js
  3. About 3/4 down the file there is this line:
    TabEffect.xpcomObj.translateToNextTab(back, 24);
  4. Set the number which is originally 24, to be something less. I put 10 and it works much faster and looks better!
  5. Install the edited add-on like you usually would.

Editing after installation

There is also a simple way to edit it after installation:

  • Go into extensions\{0784CD66-62FE-4cef-ABF4-F8ED9B654ACC}\content (if the GUID is different, search for ITabEffect.xpt in the extensions dir, and go into ..\content
  • Edit javascript.js, TabEffect.xpcomObj.translateToNextTab(back, 8); (8 instead of the default 24)
  • Restart firefox
  • enjoy!
If the graphics card is the slowing factor in your setup, this won't help you, of course ...

Market niches

  • Spotted chocolate ("Kuhflecken"), with dark spots instead of white ones
  • An alarm clock that does a short "beep" or "ding" a few minutes before wakeup time, so that you are already "prepared" for the real signal, and don't need the snooze feature so often
Any more ideas?

Wednesday, February 13, 2008

Loading an XML file into Java objects with Castor

A common problem: You have a certain XML file, of a semi-fixed format. No document type definition (DTD), no XML schema definition (XSD), just some "agreed-on" XML structure. You want to load a bunch of those files into Java, and work with them. Best would be to transfer them into Java classes or beans. Castor allows this - see http://www.castor.org/ Install Castor 1.2, you'll need the complete version with source code; otherwise, it seems to be missing some of the dependencies, e.g., velocity-1.5.jar. The scripts to run are found in <CASTOR>/bin as .sh and/or .bat scripts, e.g., classpath.bat/.sh which will be used in the following.

Step 1: Generating a schema definition

Castor is able to generate an xsd file from an XML instance file. This schema might not be complete nor correct, yet it is a good starting point. Possible, you'll have to patch it, to remove nodes that have no well-known structure, or to add others that don't appear in the selected instance file.
classpath.bat 
  org.exolab.castor.xml.schema.util.XMLInstance2Schema 
  input.xml [output.xsd]
If no output file is given, the schema is written to standard out. Alternatively, you can used the class from your own code:
XMLInstance2Schema instance2Schema = new XMLInstance2Schema();
Schema schema = instance2Schema.
  createSchema("input.xml");
System.out.println(schema);

// copied from XMLInstance2Schema#main
Writer dstWriter = new PrintWriter(
  new FileOutputStream("output.xsd"), true);
SchemaWriter schemaWriter = new SchemaWriter(dstWriter);
schemaWriter.write(schema);
dstWriter.flush();
Some Links:

Step 2: Patch the generated schema

Often, changes to the generated schema file are necessary. The input.xml may, for example, contain a set of nodes that are not really well-agreed on, change regularly, or are very different between different instance files. In our case, it was some html-formatted text that was just barely made xml-compatible by making sure each <p> also contained </p> ... not even xhtml, I'd say. So, we replaced a complex node structure
{sequence}
 {element name="p"}
  {complexType}
   {all}
    {element name="i"}
     {complexType mixed="true"}
      {sequence}
      [...]
with simple
{element name="p" type="xsd:anyType" /}
Links:

Step 3: Generate the Java classes

Next step, Castor generates Java classes from the schema definition. Again, this can either be done by the sourceGen.bat provided with castor, or programmatically via org.exolab.castor.builder.SourceGeneratorMain.main(new String[] {param1, param2, ...}).
sourceGen.bat -i output-patched.xsd 
  -package my.package.name -dest src -f -types j2
-f suppresses any non-fatal warnings, including the overwriting of existing files. -types j2 uses java.util.List for collections, even List<Type> with Java 5.0 as below. For each type Type of the schema, a my.package.name.Type java file is generated, and a my.package.name.descriptors.TypeDescriptor for Castor use. Oh, I also put a castorbuilder.properties file into the current directory which contained
# Defines the XML parser to be used by Castor.
# The parser must implement org.xml.sax.Parser.
org.exolab.castor.parser=org.xml.sax.helpers.XMLReaderAdapter

# Defines the (default) XML serializer factory to use by Castor, which must
# implement org.exolab.castor.xml.SerializerFactory; default is 
# org.exolab.castor.xml.XercesXMLSerializerFactory
org.exolab.castor.xml.serializer.factory=org.exolab.castor.xml.XercesJDK5XMLSerializerFactory

# Defines the default XML parser to be used by Castor.
org.exolab.castor.parser=com.sun.org.apache.xerces.internal.parsers.SAXParser

org.exolab.castor.builder.javaVersion=5.0
Castor Source-Generation

Step 4: Use the classes

Write some code that unmarshals the XML file(s), and prints the resulting objects. toString() is not overridden, so you have to query each attribute and subnode individually.
TopType top = (TopType) Unmarshaller.unmarshal(
  TopType.class, new FileReader("input.xml"));
// topType.getSubItem returns SubItem[]
for (SubItem item: topType.getSubItem()) {
  System.out.printf("SubItem id: %s; value: %s\n",
    item.getSomeId(), item.getSomeValue());
  // p is just the anyType object from above; toString(), it 
  //  prints the XML content as a fragment.
  System.out.println(item.getP());
}
Have fun with it!